Monday, December 21, 2009

Peanutbutter Roll Candy

I remember that you can find peanut butter rolls everywhere around Kentucky, especially during Christmas time. You would find them at church bazaars, craft fairs, bake sales and even gas stations. This is the first time I have ever made these. It was pretty easy with simple ingredients.
  • 1 1/2 lbs powdered sugar
  • 1 stick very soft butter
  • 16 oz. jar peanut butter
  • 1 tsp. milk
  • 1 tsp. vanilla extract
Mix soft butter and 1 lb sugar, vanilla and milk together with a fork; make soft ball. Pour a coating of sugar on a sheet of wax paper; sprinkle sugar on ball to keep from sticking. Put another piece of wax paper over ball. Roll out the ball thin. Remove top wax paper and spread on peanut butter. Roll up and cool in refrigerator about 1 1/2 hours. Cut into pin-wheel pieces and serve.

Saturday, December 12, 2009

Jerk Chicken Pasta

While I don't have pictures of this dish, this is really good. Invest in some good, but mild jerk seasoning. I suggest mild so you can use more of it for a richer flavor.

Gather together:
  • 2 skinless, boneless chicken breast halves (cut in to bite sized pieces)
  • 1 teaspoons jerk paste (more if you like it really spicy)
  • 1 package of your favorite paste
  • 1 tablespoon canola
  • 1 clove garlic, minced
  • 1 small onion (rough chop)
  • 1 red bell pepper (sliced)
  • 1 small box of frozen spinach (thawed and drained of juice)
  • 1/2 cup chicken stock
  • juice from 2 limes or about 2 tablespoons of lime juice
  • salt and pepper to taste
  • 1/2 cup heavy whipping cream

Bring a large pot of lightly salted water to a boil, cook the noodles until al dente, and drain.
Lightly oil the pan. Cook chicken with the juice of 1 lime until fully cokked. Remove from pan. Meanwhile, heat the oil in a large saucepan over medium heat, and cook the garlic, onion red pepper and spinach until the onion is just translucent. Mix in the chicken stock, 1 tablespoon jerk paste, juice of 1 lime, salt, and pepper. Bring to a boil, reduce heat to low, and stir in the heavy cream. Cook and stir until mixture is thickened, about 5 minutes. Do not allow it to boil. Add the chicken back to the pan. Serve sauce over noodles.

This stuff was good. I used jerk seasoning powder on the chicken while it was cooking--I like things spicy, but like I said, if you can find a mild jerk seasoning, you can add more or less if you don't like things as spicy.

Wednesday, December 2, 2009

Pumpkin Fudge

I made this for Thanksgiving and it was a hit. It's like pumpkin pie on crack.

Pumpkin Fudge
2 tbsp butter
2.5 cups white sugar
2/3 cup evaporated milk
1 cup white chocolate chips
7 oz marshmallow creme
3/4 cup canned pumpkin
1 tsp ground cinnamon
1 tsp vanilla extract

1. Line a 9x9 pan with aluminum foil.
2. Heat milk and sugar over medium heat until boiling, stirring occasionally with a wooden spoon.
3. Mix in pumpkin puree and cinnamon and bring it back to a boil again. Stir in marshmallow creme and butter. Bring to a roiling boil. Cook, stirring occasionally, for 18 minutes.
4. Remove from heat and add vanilla and white chocolate chips. Stir until all melted and then pour into pan. Cool, then cut into squares.

Sorry there are no pictures! It was quite popular.

Saturday, November 7, 2009

Bacon Cake

Samara had a milestone birthday recently and I didn't know what to get her. Gift choices are limited here in Dillingham, so I had to be creative. Anthony and I were sitting around trying to think of something funny and something Samara would like when I had a moment of brilliance. A bacon cake! I can make fondant! I can make cake! And so I made it happen.

I won't bore you with the actual cake part. I baked a butter cake and it was fine. Nothing too special, but tasted good. The important part of this cake is the decorations. First off I had to cut the cake so it resembled bacon. Here is the wavy sort of cut I did to try and get the bacon look.

I then had to color the fondant. This was a feat! The pink was easy, the red/brown color was not. I was struggling with the stickiness of the fondant and needing to add more color and powdered sugar. It was a mess and looked like I had killed someone on my kitchen counter. I eventually got it to the shade I liked.

I then had to figure out how to get the marbled bacon look. I decided to make "snakes" out of the fondant (it really is like play dough) and stick them together. I then rolled it out so it would be all smooshed together. (That's a real technical cake decorating term.) Because I had used so much food coloring my fondant was sticky, which posed some problems. Mostly the fondant sticking to the parchment paper I was using to transport it from the counter to the cake. Overall, though, I was happy with how it turned out. Samara thought it was funny and hopefully one of her more memorable birthday cakes.

Monday, October 19, 2009

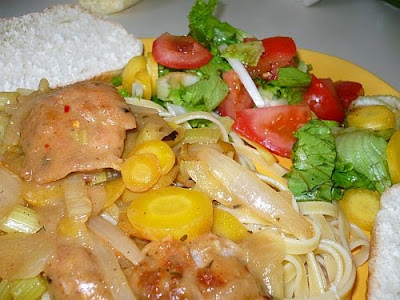
Chicken Fricassee--the easy way


I don't want anyone to be fooled in to thinking that I slave over the stove for hours to feed Aaron. He doesn't care much about food so to do so would be a waste of time. I however love food...LOVE FOOD! But that doesn't mean that I have tons of time to cook. So here is an easy dish (think 30 minute meal) to whip up on any random Tuesday.
Gather together:
  • 1lb boneless chicken bits
  • 1 medium onion, diced
  • 1 small bunch of carrots (about 4 large carrots) sliced--I used yellow carrots since they were in season
  • 3 or 4 celery stalks--sliced on the bias
  • 2 cloves of garlic-crushed
  • 2 tablespoons of canola oil
  • 3 tablespoons of butter
  • 4 tablespoons of flour
  • 1 cup of white wine or chicken stock (add more if needed to thin out the sauce)
  • 1 tsp dried tarragon
  • 2 bay leaves
  • salt and pepper
In a frying pan add the canola oil and over medium heat cook the chicken bits until they are browned on both sides. Remove them and add the onion, carrots and celery along with the butter. Cook until the vegetables are tender crisp. Then add the flour to the pot. Once the flour is made into a roux whisk in the wine and return the chicken to the pot along with the bay leaves and tarragon. Allow this to cook for another 10-15 minutes on simmer or low. Remove bay leaves and add salt and pepper to taste.

I served this over noodles with a simple green salad and garlic bread. This really is an easy recipe.

Mini Cheesecake


Erin and I subscribe to the "Good Things Catered" blog. This is a really good blog. It is also where we got this next recipe. I liked the idea of making mini cheesecakes with vanilla wafers and not having to make a crust or a water bath for a big cheese cake. This recipe is good if you just want a few bites of cheese cake.

gather together:
  • about 30 Nilla wafers
  • 1 (8oz) package cream cheese, softened
  • 2 Tbsp sour cream
  • 1/3 cup sugar
  • 1 egg
  • 1 Tbsp fresh lemon juice
  • 1 tsp vanilla extract

Directions:
  • Preheat oven to 375 degrees.
  • Line mini cupcake tin with liners and place Nilla wafers into bottom of cups (you may have to trim these slightly)
  • In bowl of stand mixer, combine cream cheese and sugar.
  • Beat to combine well until light and fluffy, about 2 minutes.
  • Add sour cream and egg, mixing well to combine.
  • Scrape down sides of bowl, add lemon juice and vanilla and mix to combine well.
  • Remove from stand mixer, scrape sides and hand beat to make sure mixture is combined well.
  • Using mini cookie scoop or teaspoon, fill each liner almost to the top.
  • Place in oven and bake 15 minutes.
  • Remove from oven and let cool.
  • Cover tightly and place in fridge overnight, or at least 4 hours before serving. (yeah, like that happened...we put them in the fridge until they were cool enough to eat)
As you can see, we topped ours with fresh blueberries and cherry pie filling. We had to hurry and take the pictures because Anthony was eating these as fast as we could top them.

Tokyo Sushi--Lexington, Kentucky

I recently went on vacation back to Kentucky. I call it vacation, but it was really more like we had business to tend to, namely Aaron needed to get sworn in to the Kentucky Bar Association. (YAY!) During our trip we managed to eat out, everyday. One of my favorite places to go is Tokyo Sushi, but I don't go there for the sushi--Aaron loves the sushi--I go there for the bulgogi.

This stuff is a Korean dish and is so flavorful and can be a bit spicy. I love this stuff and I had been craving it since I left Kentucky. I've had bulgogi at other places, but this place has the best. Plus you get a 5 little dishes of picked vegetables including kimchi (or kim chee). If you live in Kentucky, check this out. If you don't live in Kentucky, go to your local Korean restaurant and order this; you won't be disappointed.
And Aaron ordered Sushi. Like I said, this is a good place to go.

Saturday, September 26, 2009

Chocolate Chip Pumpkin Pasties


While on vacation, I finally got to see the new Harry Potter movie. It was pretty exciting. And I always love the food they serve in the movies and in the book. So to celebrate I decided to make Pumpkin pasties and to add some extra fun, I added chocolate chips. I found this recipe here.

Gather together:

  • 2 eggs, slightly beaten
  • 3/4 cup sugar
  • 1-1 lb. can pumpkin
  • 1/2 tsp. salt
  • 1 tsp. cinnamon
  • 1/2 tsp. ginger
  • 1/4 tsp. cloves
  • 1 2/3 cups evap. milk (1 can)
  • 1/2 tsp. allspice
  • 9 oz pie crust pastry (enough for two single standard pie crusts)
  • 1 egg white

Bake the pie filling only (no crust) in a large casserole dish in hot oven (425 degrees) for 15 minutes. Keep oven door closed and reduce temp to moderate (350 degrees F/180 degress Celsuis) and continue baking for 45 minutes or until table knife inserted in center of dish comes out clean. Cool on wire rack.
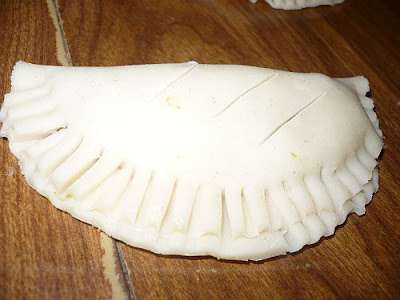
Make or purchase pie crust pastry. Roll thin and cut into circles approx 4" in diameter--I used the can the pumpkin came in to cut the circles. Put a spoonful of the cool pumpkin mixture towards one side of the center of the circle. Fold over the crust into a half-circle and firmly crimp the edges closed. Slice three small slits in the top for venting. Brush with egg whites. Place on a greased cookie sheet, and bake only until crust is a light golden-brown (about 20 minutes). Ta-da. Mini pumpkin pies with little chocolaty goodness.


These are always fun to make. And the chocolate makes them irrestiable to just about everybody. It's something about the combination of pumpkin and chocolate that is just pure bliss.

Sunday, September 20, 2009

Bourbon Spiced Pumpkin Bars


These Bourbon Spiced Pumpkin Bars were taken from the Good Things Catered blog. Having come back from Kentucky (the Land of Bourbon and horse farms) only a few weeks ago, I am still in love with all things bourbon. It reminds me of home. And since it is fall here in Dillingham, I thought I should celebrate before winter starts. Naturally, I was drawn to this recipe. Oh and I doubled the recipe because I lack an 8x8 pan--I used my 9x13. I also omitted the oil. With that much pumpkin, it would be moist enough but remember to drain your pumpkin. The recipe that follows is not doubled, but it doubles very easily.


Gather together:

1 c. all-purpose flour
1/2 tsp baking powder
1/4 tsp baking soda
1 1/2 tsp ground cinnamon
1 tsp pumpkin pie spice
1/4 tsp salt
1/2 c. white sugar
1/4 c. brown sugar
1/2 c. vegetable oil
1 (15 oz) can pumpkin puree, drained on a paper towel lined fine strainer--I used a tea towel
1 egg
1 Tbsp bourbon
1 tsp vanilla extract

Icing
1 (8 ounce) package cream cheese, softened
1/4 cup butter, softened
1 1/2 cups confectioners' sugar, sifted
1 teaspoon vanilla extract
1 tsp bourbon

Directions:
  • Preheat oven to 350 degrees and line and prepare an 8x8 baking pan.
  • In medium bowl, add flour, baking powder, baking soda, cinnamon, spice and salt.
  • Whisk to combine thoroughly and set aside.
  • In bowl of stand mixer, add eggs, sugars, oil, and pumpkin until light and fluffy, about 1 minute.
  • Add bourbon, vanilla and mix to combine.
  • Stir flour mixture into pumpkin mixture until just combined.
  • Spread evenly into prepared pan.
  • Place in oven and bake for about 30 minutes or until toothpick inserted into center comes out clean--it took about 45 minutes with
  • Cool completely before frosting.
  • Meanwhile, in bowl of stand mixer, combine cream cheese, butter, vanilla, and bourbon and mix to combine well.
  • Slowly add in powdered sugar until completely combined.
  • Frost cooled bars with icing, cut, and serve.

Saturday, September 12, 2009

Pie Pops

I really like creating food on a stick. I think it's because I'm from Iowa. Anyway, I saw these on Bakerella I believe and decided I needed to make them. Plus, I had picked a bunch of blueberries so it seemed like fate.

Look at all these blueberries I picked from the Alaskan tundra! Don't act like you're not impressed. I made a simple pie filling with berries, corn starch, and sugar. You can use canned pie filling too.

Basically you just make some pie dough, roll it out, then cut circles. Here is a picture of the pops being filled. I brushed on some egg whites to make the crust a little crispy/golden. I also over-filled the pops and they oozed everywhere, so don't fill it up as much as I did.
I baked these at 375 for 15 minutes. My oven is wacky, so I would just follow the directions on your pie crust/pie recipe. Here is a picture of the completed pops. They were cute, but not all that sturdy. I think it was too much filling.
Regardless of the fact that they weren't super pretty, Anthony enjoyed them. I mean who doesn't love blueberry pie? Especially on a stick?
Posted by Picasa

Monday, September 7, 2009

Pumpkin Bundt Cake


I'm doing it. I'm busting out the fall recipe on Labor Day weekend. I'm sure it's some sort of sin, but I'm going to do it anyway. Summer in Alaska is pretty cold, so I'm happy fall is here so the temperatures seem more appropriate. Plus, the leaves are changing colors and it just feels right. Anyway, I made this cake back in December. It was very moist and good. Happy fall!

Pumpkin Bundt Cake
2 c sugar
1 1/4 c vegetable oil
1 tsp vanilla
2 cups canned pumpkin
4 eggs
2 cups flour
3 tsps baking powder
2 tsps baking soda
1/4 tsp salt
2. tsps ground cinnamon

Preheat oven to 350. Combine flour, baking powder, baking soda, salt, and cinnamon. In a large bowl combine the oil and sugar. Blend in vanilla and pumpkin, then beat in egg one at a time. Beat in flour mixture. Pour into greased bundt pan. It took about 50 minutes to bake (but my oven is on the cooler side, so it will probably take 45 in most ovens).

Wednesday, August 5, 2009

Indecisive Cookies

I am probably one of the most indecisive people I know. I saw this recipe and figure that it would be perfect for me when I don't feel like making choices. If you are a fan of chocolate and peanut butter, you really can't go wrong with this one.

Indecisive Cookies
(from Picky Palate. She called them "Chocolate Peanut Butter Combo" or something.)

Peanut Butter Cookie
1 Cup peanut butter
1 Cup sugar
1 egg

1. Mix all ingredients together in a bowl until well combined. Set aside.

Chocolate Chocolate Chip Cookie
1 cup butter
1 Cup sugar
3/4 Cup brown sugar
2 eggs
1 teaspoon vanilla
1 3/4 Cups flour
1 1/4 Cups cocoa powder (I used a dutch process cocoa, so my cookies were very dark/rich)
2 teaspoons baking soda
1/4 teaspoon salt
1 Cup chocolate chips

1. Preheat oven to 350 degrees F. Cream the butter and sugars. Beat in eggs and vanilla. Place flour, cocoa powder, baking soda and salt into a large bowl and mix. Add to wet ingredients along with chocolate chips until just combined.

2. Take a Tablespoon (or so) of Peanut Butter Cookie Dough and a Tablespoon (or so) of Chocolate Dough and gently press together forming a "not so perfect" ball. Don't press and roll too much, just stick them together and place onto a silpat or parchment lined baking sheet. Bake for 9-11 minutes or until cookies are cooked through to your liking. Let cool for 5 minutes before transferring to a cooling rack.

So, the only problem I had with this recipe is that there is far too much chocolate dough compared to the peanut butter. I had a little over two dozen combined cookies, but ended up with almost a dozen chocolate cookies. I suppose there are worse things in the world.

Thursday, July 23, 2009

Darn Good Chocolate Cake

I didn't come up with the title of this cake (thanks Cake Mix Doctor!), but it really was pretty good. I made this for my mother-in-law's birthday. It was rich, but good. I think vanilla ice cream would be the perfect compliment to it.

Darn Good Chocolate Cake
1 package devil's food cake
1 package (3.9 oz) chocolate pudding mix
4 large eggs
1 cup sour cream
1/2 cup warm water
1/2 cup vegetable oil
1 1/2 cups chocolate chips

Preheat oven to 350. Lightly grease a 12 cup bundt pan. Blend the cake mix, pudding, eggs, sour cream, warm water, and oil for a few minutes until well blended. Fold in the chocolate chips until they are well distributed. Bake for about 50 minutes (it took me well over 60, but my oven is so-so), or until it springs back to the touch. Allow it to cool for at least 20 minutes before inverting the pan. Once you take the cake out let it cool completely. I sprinkled some powdered sugar over it so it would be pretty.

Sunday, July 19, 2009

Chocolate Oat Bars


Everyone needs a dessert recipe that they can whip up in 15 minutes and requires minimal messes. This is that recipe for me. Everyone who has tried these really likes them, and I like them because they're easy and I don't have to heat up the house.

Chocolate Oat Bars
3/4 cup butter
1/2 cup brown sugar
1 tsp vanilla
3 cups quick cooking oats
1 cup chocolate chips
1/2 cup PB

Grease a 9x9 pan. Melt the butter in a saucean. Stir in brown sugar and vanilla until combined. Mix in the oats. Cook this on low heat for about 2-3 miutes, or until the oats seemed cooked down a bit. Press 3/4 of the oat mixure into the pan to make the crust.

Melt the chocolate chips and peanut butter over low heat. Pour this over the crust. Sprinkle the rest of the oatmeal mixture on the top. Put this in the fridge until it sets up.

So easy!

Monday, July 13, 2009

Cake Pops

For our friend Saramay's birthday I created cake pops. These have been featured on many blogs before and I've always been itching to make them. Samara picked me up some candy melts in Fairbanks so I could finally make them. I thought they were pretty easy to do and looked impressive. They're sort of time consuming and tedious, but fun as well.

First, you bake a cake and let it cool. I just used a cake mix, so that gives you a rough estimate about how big of a cake to make. Then, once the cake is cooled, you break up the cake in a big bowl and put about a jar of frosting in it. You mash this up until it becomes a sort of sticky mess. I then used my cookie scoop to scoop out balls of the cake mixture. I put these in the freezer for about 15 minutes while I melted the candy melts.

I put the sticks into the candy melts and then poked them into the semi-frozen cake balls. Here is a picture:

I put this back into the freezer until the candy melt hardened up. I then sort of drizzled the candy melt over the cake ball. I tried to dip it, but that ended in sadness. (The cake ball fell off. It was tasty, though.) I then sprinkled some fancy sprinkles on it that my mom gave me. (These tasted like mocha. How fancy!)

Here are all the cake balls lined up in the styrofoam. I poked holes in the styrofoam to allow the cake pops to dry. This worked pretty well.

Overall, I think this was a success. I like how they're fairly simple to make and the possibilities are endless.


Wednesday, July 8, 2009

Baked Oatmeal

Last weekend Anthony's parents and brother were in Dillingham to see what this rural Alaska business is all about. I wanted to make them something warm and filling for breakfast, but didn't want to have to get up at 5 AM. I found this recipe and gave it a try. I really thought it was pretty good and super easy. The best part about it was I could mix the ingredients the night before then pop it in the oven in the morning. This kept me full all morning and was quite good! (Sorry there are no pictures. It just wasn't on my mind at 6:30 AM.)

Baked Oatmeal (from Cooking Light)

2 cups uncooked oats
1/2 cup packed brown sugar
1/3 cup raisins (I used crasins)
2 tbs chopped almonds
1 tsp baking powder
1 1/2 cups milk ( I used evaporated with no problem)
1/2 cup applesauce
2 tbs butter, melted
1 large egg, beaten

Preheat oven to 375. Combine the first five ingredients in a large bowl. Combine the milk, applesauce, butter, and egg in a separate bowl. (I then left them separated overnight and combined them in the morning.) Add milk mixture to oat mixture. Combine well and then put into an 8 inch baking dish covered in cooking spray. Bake about 20 minutes.

Sunday, July 5, 2009

Easy chicken & Bean Enchiladas


I know the thought of making home made enchiladas is kinda daunting. This is the stress free way of doing it. I even made 2 different types both under 15 minutes (not including cooking time). This is so easy you can do it with the kids. By using left over grilled chicken or left over crockpot chicken you can make this easy and cheap. I like the idea of cooking once and eating twice.

When I asked my friend Saramay what she wanted for her birthday, her answer was for me to cook Mexican food. I can do that. I was basically given free reign to cook what I wanted as long as I showed up at her house on Friday at 6pm with food in hand. I had decided earlier in the week I was going to crock pot a chicken, so I had some left over chicken for this dish. I call it faux enchiladas because a.) I don't use the red enchilda sauce on the chicken and b.) I don't use corn tortillas. So it's more like all things in burrito form with a different style of cheese. I do want to say that my mother-in-law taught me how to make the chicken enchiladas.

Chicken Enchiladas
2 cups of diced/shredded chicken
1 small onion diced
can of cheese soup
16on container of sour cream
1 lb of shredded cheese
1 packages of flour tortillas (taco size is fine, but you can use burrito if you want bigger enchiladas)

In a bowl mix the soup and the sour cream. Reserve 1/2 and put onion, chicken and 1/2 of the shredded cheese in a bowl.Mix thoroughly. Spray down casserole dish with cooking spray. Fill a tortilla with chicken mixture and place seam side down in casserole dish. Continue until you run out of chicken mixture & Tortillas. Take the remaining cheese soup mixture and spread on tortillas. Top with shredded cheese and heat in oven at 350 for 30 minutes or until hot and cheese is melted.


Bean and cheese enchiladas
1 can of black beans (rinsed)
1 small onion (diced)
1 pound shredded cheese
1 can of enchilada sauce (yes, the premade stuff is ok to use--red or green you decide)
flour tortillas

Mix the beans, onion and 1/2 of the shredded cheese. Fill the tortillas with the bean mixture and place seam side down in a casserole that has been sprayed with cooking spray. Continue filling with bean mixture until you run out of beans or tortillas. Top with enchilada sauce. Finish with the remaining shredded cheese. Bake at 350 degrees for 30 minutes. Serve this to your vegetarian friends.


Sorry the pictures aren't pretty. I took the uncooked over to a friend's birthday party. It was a huge success.

Fromage Fort--taken from Good Eats


What can I say, I am a sucker for the food network. What foodie isn't? One of my favorite shows is "Good Eats" with Alton Brown. It's like Mr. Wizard and Emeril had a show. It's science and food all rolled in to one. I was fascinated by this particular show due to the high cheese content and the thought of leftover cheese being used before it goes funky.

Gather together:
  • One pound of left over cheese at room temperature
  • 1/4 cup dry white wine
  • 3 tablespoons unsalted butter, softened
  • 2 tablespoons fresh parsley leaves
  • 1 small clove garlic
Remove any rinds from hard cheeses. Grate hard cheeses and cut others into 1/2-inch cubes.


Place cheese, wine, butter, herbs, and garlic in a food processor and blend until smooth, approximately 2 minutes.


Serve immediately or refrigerate for at least 1 hour for a firmer consistency. This can be stored in the refrigerator for up to 1 week. I made mine in to balls and garnished with extra herbs.


This stuff was pretty good. I didn't get to eat a lot of it due to a trip in to the interior (that means not the bush of Alaska, but some place on the road system). It was a great way to use up all the cheese I had leftover from recent trips to Anchorage. I would buy cheese in bulk and hope I would get to eat it all before it went funky. There isn't a whole lot of cheese selection here in the DLG, so anytime I make a trip out, I try to pick up a couple pounds. My favorites include: Parrano, (non smoked) Gouda, Cave aged Emmentaler, Butterkaese, Havarti & Parmigiano-Reggiano.

Thursday, June 25, 2009

Honey Dijon Salmon

Since it is in abundance here, Anthony and I occasionally eat salmon. I am betraying my vegetarian self when I do it, but there were times when we first lived here that I thought I was going to die of malnourishment and fish seemed like a good alternative to dying. I haven't quite forgotten what it was like last November, and so I'm still eating the fish. Plus, salmon are just swimming to their death anyway, so that's how I justify it. I've been trying to find recipes for salmon that Anthony will actually eat since he's not too keen with the salmon flavor. This recipe masks the fishiness of salmon, so Anthony likes it. He also really likes mustard, so it was bound to be a hit. I thought it was decent.

Dijon Salmon

1/4 cup butter (melted)
3 tbs Dijon mustard
1 1/2 tsp honey
1/4 cup dry bread crumbs
1/4 cup finely chopped pecans
4 tsp parsley
4 (roughly 4 oz) fillets of salmon
salt and pepper to taste

Preheat the oven to 400 degrees. Stir together the melted butter, mustard, and honey. In another bowel mix the bread crumbs, nuts, and parsley. Brush the salmon with the mustard mixture and then sprinkle on the bread crumbs. (Note: I had a lot of leftover sauce and bread crumbs, so I just threw all of it on there. The more the merrier I say!) Bake 12-15 minutes or until it flakes easily with a fork.

I had a picture, but it wasn't pretty. Imagine a fillet of salmon with a lot of yellow sauce on top. It tastes good, though!

Monday, June 15, 2009

Fail

Not everything I make turns out okay. Last week I had a number of failures. Take, for instance, the banana bread I made. The recipe seemed promising since it had almost 4,000 reviews on allrecipes.com. With 4.5 stars, I figured it was going to be good. A red flag went off for me when I read the recipe and saw no vanilla (come on, this is a baked good!), no cinnamon, no nutmeg, no spices at all. This recipe also called for a ridiculous amount of bananas. I ended up using over five bananas in this bread. I had a feeling the bread would have some texture issues, but I baked on anyway. Long story short, this bread was flat, gummy, and without much flavor. I even threw in some vanilla and cinnamon just because it felt right, and it still turned out sort of blah. There were way too many bananas and they just sunk to the bottom of the bread, making a weird sort of mashed banana layer. I suppose this all could have been user error, but really, no vanilla?

My second bad experience was with some oatmeal raisin cookies. I was in a hurry so I pulled the butter out of the fridge and microwaved it for 15 seconds. It was a good consistency at this point (soft, not melted) so I went forward with the cookies. I creamed together the butter and brown sugar and went to move on to the next step. It was then I realized that I still had to add white sugar. So, I added the white sugar and creamed it some more. This was a mistake, as my butter became more liquidy. By the time I added the other ingredients the butter seemed to be melted. My cookies spread in weird shapes and ended up crispy. Boo. This is my go-to oatmeal raisin recipe, so it was definitely user error.

Learn from my mistakes. Shy away from any baked good recipe without vanilla (unless there is some other sort of extract) and don't over-beat the butter.

Tuesday, June 9, 2009

Cookies and Cream Cupcakes

I was trying to figure out what to do with a white cake mix and I had a moment of brillance. I could make cookies and cream cupcakes! This was easy and had a good cookies and cream flavor. I topped it with an Oreo cream cheese frosting. Yum.

I forgot to take a picture with the frosting. They weren't exactly pretty, but they were good!

Cookies and Cream Cupcakes
1 white cake mix (and the things you need to make a cake mix, i.e. eggs, oil)
1 package Oreos

Make the cake mix as directed. Crush up the Oreos and put about 2 cups into the cake mix batter. You can put more or less depending on your personal preference. Bake as directed.

Oreo Cream Cheese Frosting
8 ounce package cream cheese (room temp)
1/4 cup butter (room temp)
3 to 4 cups powdered sugar (just depends on how stiff you want the frosting)
1/2 tsp vanilla extract
3/4 cup crushed Oreos

Whip the cream cheese and butter until fluffy. Add vanilla. Add powdered sugar one cup at a time until you get the desired consistency. Stir in Oreos.

Sunday, June 7, 2009

Gifts for Samara (& Aaron) and Erin (& Anthony)

We receive tons of emails & calls every day with questions like, "I just made beer cheese soup and the cheese is staying at the bottom of the pan burning and the whole thing is greasy. What should I do?"
And "I tried making the margarita cake, but it never fluffed up. What went wrong?"

Also, "We love your blog so much, we want to get you and Erin something nice to say thank you. What should we get foodies like you."

First, Throw that greasy mess away. And next time make sure your shredded cheese is lightly coated in flour and and small batches of cheese at a time whisking it in over low heat until melted.

Second, I did not create this recipe, so I would ask Better Crocker. It was probably old cake mix. I've had that happen too sometimes. :(

Finally, foodie gift options include fun kitchen gadgets. Erin needs a 9 cup Cuisinart food processor, so do I. Well, I use need lightly since I have a 3 cup, but with the way I cook, I need something bigger. Much bigger. We also have this weak spot for chocolate. And we both have been dying to try Vosges Chocolate, especially the Mo's chocolate bar. (Yes, Erin will eat the bacon if it is coated in chocolate.) And really who can resist flavors like:
This sounds like a fun taste explosion, but with each cand bar costing about $8.00 each, I don't think either one of us will be getting any of these for ourselves any time soon.

Just a few suggestions.

Saturday, June 6, 2009

My experience with fondant


Last weekend was our anniversary and I decided I would make a cake with fondant to celebrate. This was my first fondant experience and it was less painful than expected. I thought it was going to be terribly tedious, messy, and not all tasty. Really, fondant has been all about appearance in my past experiences. It's just so pretty! The fondant I made was super easy, not terribly messy (not any more so than sugar cookies), and tasted pretty good. Please don't judge me and these terrible photos. Fondant is a bit tricky to place on the cake. I put a few holes in the bottom white layer (that's why I put those leaves on the cake). I also didn't know what to do with the bottom of the cake so I rolled little balls and put them on the bottom. They don't look great, but it was my first time. Another thing I learned is that you should not use chocolate buttercream on the cake! You put a layer of buttercream on your cake before covering with fondant so the fondant will stick. Well, I made a chocolate cake so I thought chocolate buttercream would taste the best. It tasted good, but was a pain with the white fondant because I kept getting on the pretty whiteness. Lesson learned. All in all I thought it turned out decent for my first try. Pictures and recipe below.

Marshmallow Fondant
1/4 cup shortening
1 (16 ounce) package of mini marshmallows
4 tbs water
1 tsp vanilla
2 pounds confectioner's sugar

Put the marshmallows in a microwave safe bowl and heat for 30 seconds to 1 minute to start melting the marshmallows. Stir in the vanilla and water and stir until smooth. Slowly beat in cups of confectioner's sugar until you have a sticky dough. Reserve one cup of powdered sugar for kneading. The dough is really stiff at this stage.


I then put shortening all over my stand mixer dough attachment and let the stand mixer knead the fondant until it was smooth. I added a bit more powdered sugar. I let the mixer knead for about 5 minutes. If you're kneading by hand it will take longer. The dough should no longer be sticky but more of a play dough consistency.

Wrap the fondant into plastic wrap and let it sit in the fridge. The recipe I was using said to let it be overnight, but I only did for an hour and it was fine. When you take it out let it get to room temperature before trying to roll it out. I sprinkled corn starch on the counter to prevent sticking when I rolled out the dough.

Before placing the fondant on the cake ice the cake with about 1/4 inch layer of buttercream. This will allow the fondant to stick. I made different colors of fondant by kneading in gel food coloring. I noticed the color got darker the longer it sat, so just know that when you're coloring your fondant. I rolled the fondant out to about 1/4 inch thickness. This seemed to work well and let plenty of fondant for a two layer round cake.

Hamilton Beach 3-in-1 slowcooker: a review

After reading the 365 days of crockpotting blog, I did some research about what kind of crockpot/slow cooker I wanted. I read reviews of a number of different crockpots and slow cookers and I took into consideration my life style ( a couple with no kids who hosts a lot of dinner parties) and decided on the Hamilton Beach 3-in-in slowcooker. The problem is I have a 5 quart slow cooker that works just fine that I got about 2 years ago when one I inherited from my mom had started to leak. So there was pretty much no way I could talk Aaron in to letting me get a new $60 appliance when mine is fully functioning. I looked on line at Target.com, Macy's.com and Amazon.com, the cheapest I found it was $45, but then I had to pay shipping (which would be at least $15 if not more).

I went to the local AC "home" store on my break the other day. (Home is used loosely because it technically sells stuff like pillows, but you only have one option. And it sells things like over priced sofas and ovens, but again there is no selection, just one to pick from.) And there it was in all it's glory: the Hamilton Beach 3-in-1 slowcooker! I'm not going to lie, I knew it was there. I have known since around Christmas, but it was still $60, until today. Today it was $30. I think I can justify a $30 purchase. So I brought it home and it was all mine.
It has 3 different pots in 3 pretty colors: pumpkin orange, soft custard yellow and sage green. There are 2, 4 & 6 crocks to put in it. There are buttons you push to indicate what crock is in it and it also has a high, low and warming setting. The 2 quart bowl will be perfect for heating up a chocolate or cheese dip. The 4 quart will be perfect for a dinner just for Aaron and I and maybe one other person. And the 6 quart is perfect to roast a chicken in then make chicken soup when it is done cooking.

There was PLENTY of room in the crock for the whole chicken. I didn't even have to try to squish the wings down. I looked it on high for 3.5 hours and the meat was tender and just fell off the bone. When I added the noodles, I had it set to warm for about 20 minutes and the egg noodles were perfect and didn't become mushy. It was nice. I am so looking forward to making more things with the slowcooker. I'll keep you posted.

I want to mention that the large crock does not plop down all the way in to the heating thingy. It was engineered this way, so looking at it the first time was weird. But everything turned out fine
.

Sunday, May 31, 2009

spinach and mushroom stuffed manicotti with vodka cream sauce


I got an invite to Erin's house for dinner, so naturally I ask what I can bring. I suggest that I bring over the box of 1/2 priced manicotti that I bought last week at the grocery store. The half price was $3.15. After I got off the phone with Erin, I decided I wanted to make vodka cream sauce. This is easy and I had almost all the stuff I needed.

Gather together:
vodka
2 tablespoons of butter
3 cloves of garlic--minced
1 small onion or 2 shallots--minced
1 large can of tomatoes- I pulsed a can of whole tomatoes in the blender
1 tablespoon of dried basil--if you have fresh basil, use it instead
1 cup chicken or vegetable stock
salt & pepper
1 cup of heavy cream

Saute the garlic and shallots over medium heat until they are translucent. When those are done, add the vodka, tomatoes and stock. Allow this reduce down by at least half--this is going to take a while. Once that is reduced, add the seasonings and salt and pepper. Remove the sauce off the heat and slowly stir in the heavy cream. Add this to your favorite pasta or.....


Gather together:
1/2 lb of your favorite mushrooms:button, portabella, etc.--cleaned and sliced
1 frozen block of spinach--thawed and squeezed
2 cloves of minced garlic
1 tub of ricotta cheese
1 package of manicotti noodles
mozzarella cheese--shredded

Make the noodles according to the package. In another pan, add 2 tablespoons of extra virgin olive oil, then add the mushroom. When the mushrooms are 1/2 cooked, add the garlic and the spinach. Then the spinach is completely heated, remove the mixture from the pan in to a mixing bowl. Add the ricotta to the mushroom/spinach mixture. Start stuffing the mixture in to the noodles--it's best if you rinsed the noodles with cold water after they are cooked and sprinkle them with oil. Place the stuffed noodles in a casserole dish sprayed down with oil. Add the sauce and cover with cheese. Broil the pan until the cheese is brown and melty.


Serve this with awesome egg bread made by Erin.

Thursday, May 28, 2009

Amazing Chocolate Chip Cookies

Yes, it's another chocolate chip cookie recipe. This recipe, however, is amazing and I must share. The secret is vanilla pudding. Who knew? These cookies are soft and chewy and everything I'd want in a chocolate chip cookie.


Amazing Chocolate Chip Cookies
(from allrecipes.com)

2-1/4 cups all-purpose flour
1 teaspoon baking soda
1 cup butter, softened
3/4 cup packed brown sugar
1/4 cup white sugar
1 (3.4 ounce) package instant vanilla pudding mix
2 eggs
1 teaspoon vanilla extract
2 cups semisweet chocolate chips


Preheat oven to 350 degrees. Combine the flour and baking soda, set aside. In a large bowl, cream together the butter, brown sugar, and white sugar. Beat in the instant pudding mix until blended. Stir in the eggs and vanilla. Blend in the flour mixture. Stir in the chocolate chips. Drop cookies by rounded spoonfuls onto ungreased cookie sheets. Bake for 10 to 12 minutes in the preheated oven. Edges should be golden brown.

Tuesday, May 26, 2009

Dump Cake

Don't let the name fool you, this cake is tasty. And it's so easy it's embarrassing.


Dump Cake
1 boxed cake mix (I used a yellow one)
1 stick of butter (I used salted butter because it's better)
2 cans of fruit (I used peaches)
Preheat oven to 350. Dump fruit onto bottom of 9x13 pan. Dump the cake mix on top of the fruit. Slice the butter and place it over the top of the cake mix. Make sure you cover most of the cake mix with butter so there are no dry spots. Bake for about 35 to 40 minutes or so.

I've also tried this with cherry pie filling and a chocolate cake. It's like a poor man's black forest cake and also tasty.

Sunday, May 17, 2009

Peanut Butter Dog Treats

I was bored and decided to try making dog treats. There are loads of recipes out there on the internet, but this was the only one that I actually had all the ingredients. They were super simple. I tried the dough and they were pretty plain, but Sophie seemed to enjoy them.  

Peanut Butter Dog Treats
1/4 cup water
1/4 cup oil
1 egg
3 tbs peanut butter
2 tsp. vanilla
1 cup flour
1/2 cup oats

Combine the wet ingredients. Throw in the dry ingredients and stir them around. You can add some more oats or flour if you think the dough needs it. Roll out the dough. You can cut them into cute shapes, but dogs don't care about that. I just cut mine with a pizza cutter into 1 inch squares. Put onto the baking sheet. Bake at 400 for about 20 minutes or until golden brown.

Saturday, May 16, 2009

Crab Cakes & Remoulade


In the few months I have been working at SAFE, I am used to feeding people that come to trainings or events. This week, I had a trainer bring in fresh crab that he had caught in Juneau. It was pretty cool and yet freaky to see all those crab legs just hanging out. He didn't just bring a few crab, he brought about 40lbs of crab in. It was nice and he donated it to SAFE and everyone in the training. I managed to snag a few and de-shell them before I went home. Then, I forgot I had it for about 2 days. (D'oh!) So, I am looking in the fridge and I see the cold crab just hanging out. I figured the best thing I can do with it is to make crab cakes.

Gather together:
  • 1/2 pounds of de-shelled crab
  • 2 cups of panco breadcrumbs
  • 2 eggs
  • Tabasco Sauce
  • Worcestershire sauce
  • parsley
  • Cavenders Greek seasoning
  • red pepper flakes
  • 1 small onion--minced
Combine all the ingredients in a bowl. Shape in to patties. Pan fry these until golden brown on both sides. Make the sauce and enjoy. I know I did.


Remoulade:
  • 2 cups mayonnaise
  • 1 teaspoon Dijon mustard
  • 2 tablespoons dill pickles minced
  • 1 garlic clove, minced
  • a squirt of lemon juice
  • 2 tablespoons chopped parsley leaves
  • Several dashes hot pepper sauce
  • cayenne pepper or red pepper flakes
  • pinch of dill
Pulse all this in the food processor until smooth. Check to make sure you like the taste, but I am pretty sure you will.