Tuesday, March 31, 2009

Tagine style Chicken

I saw this on 30 minutes meals with Rachel Ray a couple years ago. It seemed fun and exotic. And if you can look over the Rachel Ray aspect of the dish, it really is very good. I made it with leftover Roasted chicken and I put some in another pan to let the vegetarians have some with tofu. This is so good, Anthony even ate the tofu. I know, I didn't really come up with this recipe, but it is too good not to try it.

Ingredients

  • 2 tablespoons extra-virgin olive oil, 2 turns of the pan
  • 4 cloves garlic, smashed beneath the flat of your knife with the heel of your hand, discard skins
  • 1 1/2 to 1 3/4 pounds boneless, skinless chicken breasts, cut into large bite-size pieces
  • 1 1/2 teaspoons grill seasoning blend (recommended: Montreal Seasoning by McCormick) or coarse salt and coarse pepper
  • 2 medium or 1 large yellow skinned onion, quartered and sliced
  • 10 pitted prunes, coarsely chopped
  • 1-ounce box or 1/4 cup golden raisins
  • 2 cups good quality, low sodium chicken stock, available in paper containers on soup aisle

Spice blend:

  • 1 1/2 teaspoons ground cumin
  • 1 1/2 teaspoons sweet paprika, eyeball it
  • 1/2 teaspoon ground coriander, eyeball it
  • 1/2 teaspoon tumeric, eyeball it
  • 1/8 teaspoon cinnamon, a couple pinches

Couscous:

  • 1 1/2 cups chicken stock
  • 1 1/2 cups couscous
  • 2 tablespoons extra-virgin olive oil, eyeball it
  • 2 scallions, finely chopped

Directions

Heat a large nonstick skillet over medium high heat. Add extra-virgin olive oil, 2 turns of the pan, in a slow stream, and add smashed garlic. Season the chicken with seasoning blend. Scatter chicken around the pan in an even layer. Cook chicken pieces 2 minutes on each side to brown, then add the onions, prunes, raisins and stock. Mix spices in a small dish and scatter over the pot. Cover and reduce to moderate heat. Cook 7 or 8 minutes, remove the lid and stir.

To prepare the couscous, bring chicken stock to a boil. Add couscous, extra-virgin olive oil and scallions and remove the couscous from the stove immediately. Cover and let stand 5 minutes. Fluff the couscous with a fork.

Uncover chicken and cook another 2 to 3 minutes to thicken slightly. Adjust the seasoning, to taste, and serve chicken on a bed of couscous.

I served this with Couscous, hummus, pita bread and a simple cucumber tomato salad. Erin thought it needed some red pepper flakes...Imagine that.

Monday, March 30, 2009

Rich Egg Bread

I have been wanting to bake bread since we moved here. With a loaf being $5 at the grocery store, it just seems more economical. I have a fear of yeast, however, so I haven't done much bread baking to date. I purchased a massive amount of yeast at Sam's Club, so I figured I needed to suck it up and try baking with yeast. This bread sounded easy enough and had a pretty braid in my Betty Crocker cookbook. I am pleased to announce that I have made this bread twice in two days. It is good and actually rose the way it was supposed to!

Forming the dough ball. I LOVE my KitchenAid mixer. I don't think I can stress enough how happy this machine makes me on a daily basis.
My attempt at braiding. I haven't had to braid in such a long time. It turned out pretty well.
The loaf rose and baked up nicely. It is a pretty dense bread and has a really nice flavor. I made French toast with it this morning and it was tasty! Overcome your fears of yeast and try out this loaf!

Rich Egg Bread (From Betty Crocker Cookbook, 2006)
3 to 3 1/4 cups all purpose or bread flour (I needed 3 1/4 and then some)
1/4 cup sugar
1 1/2 tsps salt
1 package regular or quick active dry yeast
1 cup very warm water (120-130 F)
2 tbsp vegetable oil
1 large egg

Mix 1 1/2 cups of the flour, sugar, salt, and yeast. Add warm water and oil. Beat with an electric mixer on low speed for 1 minute, scraping the bowl. Bean on medium speed 1 minute, scraping the bowl. Add egg and beat until smooth. Stir in remaining flour until the dough is easy to handle.

Knead dough for about 10 minutes or until dough is smooth and springy. Grease a large bowl and place dough in to rise. Cover the bowl loosely with plastic wrap and let it rise in a warm place for roughly an hour until it doubles in size. If you poke the dough and an indentation remains, it's ready to go.

Lightly grease a cookie sheet. After punching the dough to let out the air, divide the dough into 3 parts. Roll each into 14 inch ropes (I did this like how you make a snake with Play Dough). Braid the ropes gently, starting in the center. Pinch and tuck the ends. Brush the dough with vegetable oil (I just sprayed it with Pam). Cover with plastic wrap and let rise for another 40 to 50 minutes, until it doubles in size.

Heat the oven to 375 and bake the bread for 25-30 minutes (It took mine 3o minutes). It will be a pretty golden brown when done.

Thursday, March 26, 2009

It hurts so good.


My new love in life is Sriarcha. Most people close to me know that I love my food spicy. The more pain, the better. I had this sauce before in the Lower 48, but never purchased it. Then I met Samara and she had some at her house. It was then that I discovered my love for it. It is hot but has the most amazing flavor. Some hot sauces just taste like hot (if that makes sense). This one actually has a Thai sort of flavor about it. The ingredients include things such as hot chilies, vinegar (I also love vinegar), salt, sugar, and garlic. It's simple but comes together to make the best hot sauce ever. I almost literally eat it on everything savory. Now that I think about it, you could probably do something with Sriarcha and chocolate cake. 

If you like spicy foods I highly recommend this sauce. Just look for the bottle with the rooster on it. I purchased two giant bottles at Sam's Club for $6. What a deal! So much food happiness for $6. I also snuck it into a Mexican restaurant once when we went to Anchorage.

Wednesday, March 25, 2009

Southern-Style rolled out Chicken and Dumplings

I have to say, I do miss things like chicken and dumplings (dump-lins). And I don't mean those biscuit dough balls that sit on top of a cream of something with some chicken bits thrown it. No, I mean the real ones that you have to roll out, then cut in to vague noodle form and put in to a pot of seasoned chicken stock--the kind my great-grandmother made every family get together. (They could never be as good as those, but I tried hard enough)

Gather together:
4-chicken bits (4 breast, thighs, boneless or whatever you prefer)
3-5 carrots
1 small onion
2 cloves of garlic
salt
pepper
bay leaves

for the dumplings
1.5 c. flour
2 eggs (slightly beaten)
1 tsp salt
3 tbs cold water
2 tbs butter
2 tsp basking soda

In a large stock pot, add chicken bits, a bay leaf & some salt and cover with water. Boil this for about 30 minutes or until chicken is cook completely. Remove the chicken and allow it to cool so you can de-bone & shred it. Remove any chicken scum that floated to the top.
Add the vegetables and continue cooking over medium heat.

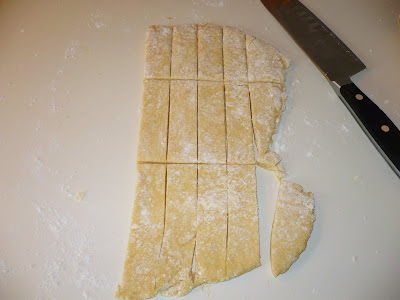
Meanwhile, in a bowl, cut the butter into flour, baking soda & salt. Next, add the eggs and the water until a dough ball forms. Then kneed the dough until you get a smooth consistency. Let the dough rest for 5 minutes. Roll the dough out on a lightly floured surface until it is 1/8 of an inch thick. Cut in to 1/2 inch by 4 inch strips.


Starting adding the dumplings in to the slow boiling pot of chicken stock one at a time. Resist the urge to stir. Keep adding until all of them are added. Then slowly, with a wooden spoon stir, just to make sure none of the dumplings are stuck to the bottom. Turn down the heat to medium-low. Add the chicken back to the pot. Add salt and pepper to taste. Simmer for 10 more minutes. Ta-da. (If you like it to be thicker, you can add corn starch, flour or heavy cream) Allow to cool in bowls for a few minutes before serving. Add parsley for garnish.


Serve with with bread, crackers or corn bread. This is so true southern cookin'!

Tuesday, March 24, 2009

Groundnut Stew or groundnut chop

Groundnut is the common African word for peanut, and Groundnut Stew or Groundnut Chop is one of many "Chop" dishes served in Africa. I was watching Anthony Bourdain's "No Reservation" and he was in Ghana. During the trip they stopped at a Chop Cafe and I just wanted to have some of that. It seems that some of my cooking lately has been inspired by Anthony Bourdain's adventures. So here is my version of groundnut stew.


Gather together:
1 medium onion (diced)
2 cans of crushed tomatoes
3 cloves of garlic (crushed)
a few stocks of celery
1 bunch of carrots
1 red pepper
1 tsp thyme
2 bay leaves
2 tsp ground ginger

Saute those items in a large stock pot.


In another pot at the same time cook 3 large, sweet potatoes cut in to medium chunks .


In the tomato pan, add 1 cup of natural creamy peanut butter or if you live in the Alaskan Bush and refuse to pay $18 for peanut butter you can use Flavorite Brand for $7.99. Stir that until it turns in to a bubbling goo. Add a can of chilies and your favorite vegetable or chicken stock. Simmer this on medium-lowfor about 30 minutes. Add the sweet potatoes to the pot. Add salt and red pepper flakes to taste.

I served this with hard boiled eggs cooked in the stew--leave the shell on and place in the stew for the 30 minutes. I also served it with rice, avocados, flat bread and red pepper chili sauce. I also made roast chicken in the crock pot and shredded it and put it on top.


Chicken can be fried in the pan before the vegetables, but since Anthony and Erin were coming over, I made it on the side.


This is pretty good. It has a light peanut flavor. You can make this as spicy as you like. I like it spicy, but Aaron isn't so much with the level of spice I am comfortable with. This tastes awesome with beer. I am not normally a beer drinker, but this just brings it out. This is just easy to make and is filling.


If you are interested in other groundnut stews, check out this link.

Monday, March 23, 2009

Irish Soda Bread

I know it's a bit late, but I finally made Irish Soda bread. Everything I read said that real Irish Soda Bread does not contain caraway seeds or raisins--which is good because I don't have any. Although I will need to pick up some raisins if I want to make Faux Tagine Chicken, but that's another post for another day. If you want a few more Irish Soda Bread recipes, check out this site. It was pretty neat and very informative. And I know that this isn't really an authentic Irish Soda Bread, but I had all the ingredients for this one.

I started with this simple recipe:
  • 4 cups of flour
  • 4 tablespoons white sugar
  • 1 teaspoon baking soda
  • 1 tablespoon baking powder
  • 1/2 teaspoon salt
  • 1/2 cup margarine, softened
  • 1 cup buttermilk--I didn't have any buttermilk so I used the old vinegar trick
  • 1 egg

Preheat oven to 375 degrees. Mix the dry ingredients. Then unlike me, add the margarine. Stir in the buttermilk and egg until a big sticky ball is made. Put on a floured surface, knead a few times. Put dough in to a greased iron skillet. Cut a cross in to the dough. Let it bake for 40-50 minutes or until a toothpick comes out clean.


I really suggest adding the margarine. My dough was really dry and didn't take all the flour. I threw away probably about 1/2 cup of flour. It turned out like a big, dense biscuit that had a vague bacon flavor--I blame the cast iron skillet. It did have a nice crust about it. I smeared it with butter and honey; it was fine. I would suggest making the dough spread out in the skillet as much as possible-punching it in there or shaping it the right size before putting it in would work as well.


Friday, March 20, 2009

Monster Cookies

I have a lot of oatmeal for some reason and had a bag of M&M's in the freezer, so I thought Moster Cookies sounded like a good idea. I have never made them before, but fondly remember them from the cafeteria in high school and wanted to give them a try. Who knew they have no flour?


Monster Cookies (from Baking Blonde)
1/4 cup butter, room temp
1 1/4 cups brown sugar
3/4 cup white sugar
3 eggs
2 tbsp vanilla extract
1 1/2 cups peanut butter (I used crunchy)
1 tsp baking soda
1 tsp salt (I wish I would have done this.)
4 1/2 cups oatmeal (either quick or old fashioned is fine)
3/4 cup choclate chips
1ish cup M&M's (for some reason my bag was all green ones)
You can really add whatever add-ins you like. This is what I had on hand.

Preheat the oven to 350. Combine butter and sugars. Add eggs and vanilla and beat until combined. Add peaunt butter and baking soda (and salt) and beat until combined. Add in your oatmeal. (My KitchenAid took this like a champ, but the batter is very thick. This is your warning.) Stir in your add-ins. Drop on cookie sheet and bake for 8-10 minutes. (Mine took the full 10.) It makes about five dozen cookies.

The Rating
Anthony thought they were about an 8 out of 10 (with 10 being his favorite cookie ever--the no-bake). I thought they were a little plain. I really think the recipe needs at least a tsp of salt. Possibly more considering how big the recipe is. These are okay, but I think they have the potential to be really good with a little salt.

Wednesday, March 18, 2009

Mole sauce with chicken or tofu

I kick my self in the butt every time I think about all the times I dismissed my grandma when she was cooking. To this day, I still have a rough time making tortillas from scratch. So it seems only natural that I should try my hand at making mole (moll-lay). Grandma did it. I should be able to do it. This is not a sweet dish. I know it has chocolate in it, but this is a savory dish.

I used the crock pot to cook the chicken in. It just seemed easier. I used 3 pounds of chicken thighs, added a bay leaf, salt and garlic. Cook it on high for about 4-5 hours. It will take some time if you want to make a good mole. I once again did not measure things, just do it until it looks & tastes right. And I always run in to the problem of not finding exactly the right ingredients that I need. So here is the list of ingredients that I used:
  • ground cumin
  • ground coriander
  • pumpkin spice--it has both cinnamon & clove in it so it works out
  • red pepper flakes
  • salt
  • canola oil
  • toasted pine nuts--not needed, I just used what I had
  • toasted almonds
  • tahini paste (I am lucky that Ann sent this to me, b/c there is no finding this here)
  • unsweetened bakers chocolate
  • sugar
  • 1 can of green chilies--diced
  • ranchero salsa (I needed Ancho chilies, but there was no getting those here)
  • 2 cans of tomatoes--crushed or what ever you have on hand
  • 1 jar or roasted red peppers--diced
  • 1 medium onion-small diced
  • 2-4 cloves of garlic (or if you have any of that roasted garlic left you could use that)
  • Raisins (I didn't use any, I have no excuse other than I just forgot)
  • vegetable bouillon base
  • water
This is going to take some time. This is not a 30 minute meal! Not at all. If you haven't roasted or toasted your pine nuts & almonds do this first. Just a simple toasting in a dry pan over medium high heat. Do not over toast, meaning don't burn them. Keep moving the pan around to keep them from lingering in one spot for too long. Once, they are toasted, pulse in a food processor or blender until it is powdery...if you do it too long, it will turn to paste. This does not ruin anything so just go with it.

In a dutch oven or large heavy sauce pan, add about 2-3 tablespoons of oil on turn it to medium heat (use can use lard, my grandma would have used lard, but the vegetarians would not have eaten it) . Next add the cumin, coriander, red pepper flakes, and pumpkin spice. Add enough to make a bubbling, liquid goo, but not a thick paste. Let this cook for about 10 minutes stirring constantly. It will get darker, let it get dark, but don't let the spices burn. Next add the onion and garlic. Let those get coated in the spices and get tender. Next add the roasted red peppers, tomatoes with juice, chilies, ancho peppers (if you have them--if not add the rancho salsa) and raisins. Let this simmer so all the flavors can combine, about 10-15 minutes.

Next, if you have an immersion blender, you can use that. I have the old style blender, so I had to do a few batches and dirty up another bowl, then transfer it back to the pot. With everything blended, start adding the almond & pine nut crumbs/paste. Next add a couple tablespoons of tahini paste and the veggie bouillon and about 2 cups of water. Now, coarsely chop the chocolate bars and add them to the pot. I used all 8 squares. Keep stirring the pot, you don't want the chocolate to settle on the bottom and burn. Keep stirring. Look at the bubbling goo and keep stirring. This will take about 15 minutes. It will turn from a red-ish orange color to a dark brown color. It will also thicken up as you go. Taste the sauce, it will need salt. It might need a bit of sugar. I added about 2 tablespoons of sugar and you know, enough salt to make it not taste like it need salt. Let this simmer for a few minutes more and you are done with the sauce.

(I know what you are thinking, but this really is good. Even if it is dark brown...just keep thinking about the chocolate in it)

Now assuming you had the chicken in the crock pot, you can take it out (de-skin and de-bone it if you used bone in chicken) and shred it a bit. Mix the shredded chicken with the sauce. Serve this with rice and tortillas.


I had enough sauce to give Erin some for her tofu, some for the chicken and about a quart to freeze for later. THIS WAS FREAKING AWESOME! I realized about 1/2 way through with this, you can't really screw this up too bad. You can add anything you like. You blend everything. And the chocolate makes it all better. I realized that this dish is not for everyone. It's a spicy, savory, chocolate sauce. Aaron even ate seconds. I was impressed.

Erin made her's with tofu. I went home with my sauce before she made her tofu, so I have no idea how it went.

This is Erin:
The mole sauce was awesome! Anthony doesn't even like tofu and he ate a bunch of it. Tofu is pretty much a blank slate, so it soaked up a bit of the sauce and was so tasty. All I did was fry the tofu until it was a little browned with some red pepper. This took about five minutes (a perk to vegetarian cooking!). Then I put some mole sauce in the pan and heated it up with the tofu. We ate this over rice. It was so good! Like Samara said, probably not for everyone (it has a unique flavor), but we really enjoyed it.

Tuesday, March 17, 2009

Lemon Bars


It's still cold and winter here so I wanted to make something light and summery. I received two lemons in my produce box, so I thought lemon bars would be the way to go. I really like this recipe. It was easy, lemony, and not too sweet. It has a nice, buttery crust and a good amount of lemony custard. Recipe after the photos!

The buttery crust.


The pretty lemons. I love yellow, so I naturally am drawn to lemons.


Best Lemon Bars (from allrecipes.com)
1 cup butter softened
1/2 cup white sugar
4 eggs
1 1/2 cups white sugar
4 tablespoons all-purpose flour
2 lemons juiced and zested

  • Preheat oven to 350 degrees. Blend together softened butter, 2 cups flour and 1/2 cup sugar. Press into the bottom of a greased 9X13 pan. Bake for 15 to 20 minutes until firm and golden. In another bowl, whisk together the remaining 1 1/2 cups sugar and 1/4 flour. Whisk in the eggs and lemon juice and lemon zest (I love my Microplane!). Pour into baked crust and cook for another 20 minutes. The bars will firm up after cooling. I added some powdered sugar to the top to make them pretty.

Monday, March 16, 2009

Easy peasy Pumpkin soup

I didn't get pictures. I'm sorry. But this went so quickly, I didn't have a chance. But this was SO EASY!. It only takes about 10-15 minutes and people will think you slaved over the stove for hours.

1 large can of pumpkin (not a can of pumpkin pie mix)
1 carton of chicken stock or Vegetable stock
1 pint heavy cream
garlic salt (2 tablespoons)
curry powder (1-2 tablespoons more if you want it hotter)
red pepper flake (optional--just to add heat, Erin would love this)

In a heavy saucepan, pour chicken stock and add all of the pumpkin. Heat this until it is almost boiling. Don't let it boil. It will just burn pumpkin to your pan. Turn down to low heat and add the garlic salt and curry powder. Add the heavy cream and let it simmer for a few minutes. This can be served with small noodles or rice.

You can do this in your crock pot if you want as long as you don't add the cream until you are ready to serve--just add everything else to the pot. Put it on low heat for 1-2 hours. Add the cream right before serving.

Crock Pot Hummus

This is not the first time I have used dried chickpeas to make hummus, nor is this the first time I have made hummus. But it never ceases to amaze me how amazing this stuff is. Chickpeas don't exist here in Dillingham. There are no dried or canned chickpeas in the stores. This makes me sad. So a few months ago, my friend Ann sent me some dried chickpeas and they were at a great price. (I need more chickpeas!)


This is how you prepare the chickpeas:
  1. Add dried chick peas to crock pot--I have the 6 qt with the removable crock and I covered the bottom. (about 2 cups of dried chickpeas)
  2. Add cold water.--Enough water to cover all the chickpeas and allow the chickpeas to expand about 3 times their size.
  3. Let them soak over night--I let them soak for about 12 hours
  4. Drain the water
  5. Add water--I filled it about half way full making sure all the peas were covered with room for them to expand
  6. Set the crockpot on high for 4 hours or low for 8 hours--you can go to work and the chickpeas will be done by the time you get back
  7. Drain reserving about 1 cup of liquid

Some recipes call for baking soda. DO NOT DO THIS. Just soak them over night and cook in the crock pot. They turn out perfectly.

I didn't exactly have all the things most of the hummus recipes called for so I used what I had and I'm not not one to measure--I just eyeballed it. Here is what I did (roughly):
  • add 4 c. chickpeas to blender
  • add the juice from 1/2 a lime-most people use lemon juice
  • add 2t of tahini--Ann sent me this as well.
  • add 1/4 cup of oil-I used canola oil instead of olive oil
  • add 1 tbls of salt
  • add 1 bulb of roasted garlic--see this post
  • add 1/2 cup reserved liquid
Blend. Shake blender. Blend again. You can add more more oil or liquid if its too thick. If its too thin, add extra chick peas. Mine turned out super. Aaron thought he should eat it warm with Kettle Salt & Pepper chips. I also added Mrs.Dash and chili flakes to this. You can add what ever you like, more garlic, less garlic, dill, Cajun seasoning, really add what you want. I thought about adding the roasted red peppers to the mix, but I had a hard time keeping Aaron out of the kitchen while I was blending so I just let it go.

Sunday, March 15, 2009

Faux Chicken Etouffee

I like spicy food. Ok, I really like spicy food. And after a week of not being able to taste anything due to cold medicine I wanted something flavorful and spicy. It also helped that I spent 2 days at home instead of going to work and watched the foodnetwork and the travel channel. After watching Anthony Bourdain's show, "No Reservations" about the restaurants in New Orleans (after Katrina), I just had to have me some etouffee. Since I have never been to New Orleans and have only had cajun food at Bourbon and Toulouse in Lexington, Kentucky, I figured I would do the best I could. What I came up with was a bastardized version that resembled something like what I imagine a real etouffee to taste like.

The previous night I cooked some bacon and reserved the grease. (It had not been sitting around for days and nothing makes things taste better than a little pork fat.) Every good southern girl keeps her bacon grease even if she is in the public health profession. I figure if hot bacon grease doesn't kill it, nothing will.

Gather together:
1 lb of chicken boobs (cut up in to strips)
some flour (enough for the flour and to make a roux)
1 can of beer (I used the finest American Lager I had...the beast)
3 stalks of celery (diced)
1 small onion (diced) I also added 1 shallot
1 red pepper (diced)
2 cloves of garlic (crushed and chopped)
2 bay leaves
blackening seasoning (I use salt free)
Butter

Dredge the chicken in seasoned flour (enter blackening seasoning). Cook in bacon grease on medium heat. Do not burn the oil or the flour on the chicken, so keep it on medium. After the chicken is browned and throughly cooked, remove and set aside. If you need to add some butter at this point to make about 2-3 tables spoons of liquid please do so. Remove your hot pan off the burner while you add flour one tablespoon at a time until you get a brown roux. It will resemble liquidly brown sugar (not paste). Put back on the burner on low medium & cook this until it is a milk chocolate brown, but not burnt. If it smells burnt, do not use. Add the veggies and coat in roux. Let the veggies get soft in the roux then add the can of beer and about 1/2 cup of chicken stock or water. Add bay leaves and seasoning. Add Simmer this for about 15-20 minutes until thick. Add the chicken back to the pan and cook for another 10 minutes adding water if the gravy needs to be thinner.

When this is finished it should be a brownish color gravy with chicken bit and vegetables in it. Served over rice with garlic bread.


This is really good. I know it's not the real thing. I think the real thing has tomotoes or milk or something else in it. It seems like a spicy chicken fricassee to me. My husband was even happy to eat seconds. It was filling (but not over filling) and it felt like home. I can imagine I would like New Orleans if it tastes anything like this.

Chocolate Chip Cream Cheese Cookies

Occassionally we can get a good deal on cream cheese. Usually that is because it is expiring. Living in the Bush has taught me that expiration dates really are more of a guideline, and if you want to save some money you have to buy old things. One of the sales on cream cheese arrived and I ended up with three packages of it in my fridge. I was craving a baked good, but had no eggs and no springform pan, so cheesecake was out of the question. Luckily, BakingBlonde saved the day and I found this lovely recipe.
The dough came together nicely. It had a good consistency and was yummy! Since there's no raw egg you can eat as much cookie dough as you want! (Although the risks of raw egg have never stopped me before.)
This recipe made about 2 1/2 dozen cookies.

The finished product was good. I am a fan of a soft, chewy chocolate chip cookie and these were just that. They had great texture. The cream cheese flavor was very subtle and I think even non-cream cheese fans would like this cookie. Do try this recipe!

Cream Cheese Chocolate Chip Cookies
2 cups plus 3 Tbsp all-purpose flour
1/2 tsp baking soda
1/2 tsp salt
12 Tbsp (1 1/2 sticks) unsalted butter, melted & cooled until room temp
5-6 oz. cream cheese softened (I used 6 oz.)
1 cup brown sugar, packed
1/2 cup granulated sugar
2 tsp vanilla extract
1 1/2 cups semisweet chocolate chips

Whisk dry ingredients together; set aside. With electric mixer, or by hand.Mix butter and cream cheese together with a mixture until smooth. Add sugars and beat until thoroughly combined.Beat in vanilla until combined.Add dry ingredients & beat at low speed just until combined. Stir in chips. Chill dough overnight. OR Drop dough onto parchment lined baking sheets (I didn’t do this and they turned out fine.) and bake for 12-14 minutes or until edges are set and bottoms are light brown. Do NOT overbake!
Cool cookies on sheets until able to lift without breaking and place on wire rack to cool.

Saturday, March 14, 2009

Roasting Garlic

If you haven't roasted garlic before, you are missing out. This is one of the easiest things you could possibly do with your oven besides throwing a frozen pizza in it. Plus, you can use roasted garlic in so many things. I put some on bread with a bit of butter and made the awesomest garlic bread ever. And tomorrow, I plan to add it to the homemade hummus I am making.

Preheat the oven for 350. cut the top off the bulbs of garlic. Add olive oil and let that soak in. Sprinkle with sea salt and ground black pepper.

Fold foil around the bulbs to make an envelope. Bake the packet for about an hour. If you aren't getting the caramelization you want, unfold the packet, and put them back in for 15 minutes. They will look golden when they are finished and they will be sweet and tender.

These are awesome. Spread them on crostini. Add them to soups, salsas, pasta dishes...The possibilities are endless. I make this roasted pumpkin & Garlic soup...OMG! It is so awesome!


And they are vegan, which means nothing to me, but some people like that sort of thing. In case I haven't mentioned this before, I am not a vegan and I am not a vegetarian. Erin, however, is a vegetarian. So most of the things she makes doesn't include meat. This is too bad, because I love bacon. Usually when Erin & Anthony come over, we choose to make meatless entrees. It's just cheaper to do that. But then there is bacon....Mmmm....bacon.

Beaver Round-Up


Editors note: This post was written by Erin. Samara made comments in italics.

Every year in Dillingham they celebrate Beaver Round-Up. I believe at some point in history it was a time when trappers came into Dillingham after collecting their beaver pelts? I could be wrong. Now it's more of a reason to get out of the house because winter has gone on too long and everybody has cabin fever kind of celebration. Either way, there are dog races, turkey bowling, the infamous Beaver Buns contest, and most importantly, a bake off.

This was my first bake off. I was scared to enter my baked goods into a contest. Luckily, Samara wanted to join in on the fun and this made the whole thing less intimidating. Samara and I decided to make a 14 layer cake. We figured this would be impressive and the recipe didn't sound all that hard. So, here is the story of our 12 layer cake (somehow, we lost two layers). However, 12 layers are just as impressive as 14, and if you consider all the chocolate goo we added between each layer, it's almost like 24 layers, 25 if you count the butter cream frosting.

12 Layer Cake
First, we preheated the oven to 350. Then we cut circles of parchment paper to fit inside the ridiculous amount of cake pans. Do this! I had no idea that parchment was my friend. It seems like regular waxed paper would work, but this stuff is pretty awesome.

Basically we just made the recipe for two yellow cake mixes, using butter instead of oil and adding roughly a tablespoon or so of vanilla. (In the future the recipes will be more precise, I promise.) Erin promises. I make no such promise.


We put about 3/4 cup of batter into each cake pan. We ended up with about 12 layers instead of 14. Oops!
We baked them for about 15 minutes and then let them cool. The parchment paper was a lifesaver. Also, we sprayed the parchment down with pam and then floured it. Nothing was going to stick to the pan.

We then made a sort of icing (more like chocolate goo) to put in the middle of the layers. We were not entirely pleased with the consistency of the icing, but it tasted okay. It was just way too thin and runny. Here is a good action shot of Samara putting the icing on the layers.

This is how you can leave the cake if you like. We thought it was pretty ugly, so we wanted buttercream. (Plus, what is a cake without buttercream?) Here it is before we put the buttercream over the top. It looks like pan cakes. It's not. It takes like cake. And it's really moist. I attribute it to all the extra butter.

To save yourself some mess, place the cake on a cooling rack with a pan underneath it to catch the icing. This was a tremendous help.
We let the cake set up in the fridge and made the buttercream. We made a chocolate cream cheese buttercream to cover the gaps and make the thing pretty (and chocolately). We weren't in love with the buttercream at first. We made some changes (noted below in the recipe) that seemed to help. The cream cheese gave it a slightly interesting taste and we felt wasn't the greatest on its own, but with the chocolate icing in the middle and the yellow cake, I think it was a good choice. I am still not in love with that buttercream. And to make it look fancy, I shaved chocolate bars on the top. It was rustic.
After putting on the buttercream we let the cake sit in the fridge over night. The next morning I rushed the cake over to the church for the bake off. Stupid daylight savings time almost made me miss the deadline, which would have been tragic!
We arrived back at the bake off later that afternoon to find out how we did. We were pleasantly surprised to have won second place! For our first bake off, I think we did well. We also entered a couple other baked goods. Here we are in all our glory:


And here is a close-up of the cake:


We won second in the cake part of the contest, there was also a dried fish category and an akutaq category. In case you have never heard of akutaq, it's also called Eskimo ice cream. It's make with a fat (usually crisco), sugar and berries. And for the more traditional version adds salmon to it.

It wasn't as pretty as the one Bakerella did, but it was magnificent. I didn't even want to try a piece because I was still recovering from a sugar coma from the previous day's baking. After Samara asked me to try it for her (she was sick), I broke down and tried a small sliver. It was hard to cut, but so pretty with all the layers. The thing was good! It was so moist and had a good chocolately flavor. I love yellow cake and chocolate frosting, so this cake was right up my alley.

After the people of Dillingham were able to sample the cakes, they voted in a people's choice award for their favorite baked good. Samara and I were pleasantly surprised to win the people's choice award at the bake off! (The people's choice is actually the over all winner of the contest. Yes, we even beat out some of the smoked fish strips and the akutaq) I think people were having pity on us as we had slaved away our entire Saturday on the cake. Either way, it made my first bake off experience a good one and made me excited for next year's Beaver Round-Up. We're still anxiously waiting for our big blue Beaver Round-Up first place ribbons!

Icing for the layers:
3 cups sugar
1/2 cup unsweetened cocoa powder , preferably Dutch process
1 cup (2 sticks) unsalted butter, cut up
1 can (12 ounces) evaporated milk
1 tablespoon vanilla extract
2 tablespoons of corn starch--add more if it is too gooey for you

Bring the sugar, cocoa, butter, and evaporated milk to a full boil in a large saucepan. Reduce the heat to medium-low and cook until the icing has thickened slightly (it will resemble chocolate syrup but will thicken as it cools), about 3 minutes (For some reason it never really thickened for us, so we decided to boil it again and add some corn starch). Stir in the vanilla. Let the icing cool until thick enough to spread, but still pourable.

Dark Chocolate Cream Cheese Buttercream Frosting (from Bakerella)
1/2 cup butter, softened to room temperature
8 oz. cream cheese, softened to room temperature
1/2 cup unsweetened cocoa powder (
We used Hershey's Special Dark Cocoa)
1 box (1 lb) confectioner's sugar (
We didn't use quite this much)
1 tsp vanilla
1-3 Tbsp milk
1 tsp salt

Cream the butter and cream cheese with a mixer. Add the cocoa and vanilla. Add the confectioner's sugar in small batches and blend on low until combined. Scrape down sides with each addition. Add 1 tablespoon of milk at a time until you get the consistency you desire. We added salt to cut down on some of the sweetness. For some reason salt makes everything better.

It was good. I was happy with the results and I was happy for it to be over. I had also entered the easy-way out apple dumplin's. Which also got a second place in the other dessert category. Here is the recipe:

1 apple--peeled, cored and sliced in to 8 pieces
1/2 stick of butter
1/2 cup brown sugar
1/2 cup of sugar
1 tbls of cinnamon
crescent rolls--see, the easy pastry
1/4 can of sprite zero (or favorite citrus soda)

Open the can of crescent rolls and fold 1 apple slice in to each triangle to make little pockets or envelopes. Place them in a casserole dish (a 9x11 pan works well) In a small sauce pan, melt butter, sugar and cinnamon. Cook just until melted. Pour over all the dumplings. Next add the sprite zero. (I have no idea what the soda does, but it makes it awesome) Bake for 45 minutes at 350 degrees. Allow to cool for at least 15 minutes before you eat them. They are ugly and when I first made them I was really skeptical. But now people ask me to bring them to potlucks and to work related dinners. They are just so easy to make. Try it. You won't regret it. (2nd place says it all.)


Friday, March 13, 2009

Introductions: Erin & Samara

Welcome to the blog. I feel like I was just writing lyrics to a new Pink Floyd album. "Welcome to the BLOG...What have we eaten? It's ok, you know what we've eaten."

The short story is Erin and I (Samara) moved to Dillingham, Alaska. Not together, we actually didn't know each other until she moved up here. And as it turns out, we are foodies. We talk about food. We dream about food. We want to knit food but we are not that talented yet! And now we blog about food.

The Long Story: (Samara) I moved to Dillingham (with my husband Aaron--I know it gets confusing but stay with me) in August 2008 from Lexington, KY. When I left Kentucky it was 90 degrees and I was wearing flip-flops. When my plane touched down in Dillingham it was 40 degrees and the only shoes I brought we me were flip-flops. The only coat I brought was a light hoodie. This was not smart on my part. Besides the weather, the next biggest shock was the prices of food. Milk is almost $8.00 a gallon. We didn't have a thing to eat when we first moved up here and almost all our money was spent turning on things like electric and paying rent. The food budget we made in Kentucky was spent the first day on oreos and ramen noodles. It was sad. We spent $90 on a 12 pack of pepsi, oreos, electrical tape and ramen noodles. Again it was sad. But then we got paid and things got better and then Erin moved up here and things got even better. We got to celebrate New Years Eve and we made cheddar fondue. It was awesome. But I am getting ahead of myself...

The Long Story: (Erin) It's difficult to find a job during a recession, so you do things like randomly apply for a job in Bush, Alaska. My husband, Anthony, had a life goal to live in Alaska, so he found me a job here and I went for it. Last November we moved from Kansas to Alaska. It was 70 degrees when we left and there was snow on the ground when we arrived here. Things were not easy at first. We were poor and food here is incredibly expensive. We were eating a lot of potatoes. But, like Samara, we got paid and things got better. Then we met cool people and things got much better. Now I spend most of my time working, baking, and walking my dog. And now writing a cooking and baking blog.

So there you have it, the story about how we got to the Alaskan bush. I should probably tell you why we consider ourselves foodies. First, I like to cook and Erin likes to bake. Second, we talk about food all the time. Third, one of our favorite weekend activities include going to one of the 2 grocery stores and walking around the 12 isles. In fact, we did that just today. We had a specific mission: take pictures of the high price of food in the bush.

Yes, that is a 1/2 gallon of milk for $4.89. The gallon of milk is $7.98. And it's all Ultra-Pasteurized. The boxed unrefrigerated milk is big here. It's kinda weird. I try not to think about what they have to do to make it so it doesn't need to be refrigerated.

Oh good! Ground clove is on sale for $13.54. I should stock up!

Oh good! Poppy seeds and Sesame seeds are on sale. If I bought 5 bottles of poppy seeds, I could make poppyseed filling. Because I can't just buy poppyseed filling. No, that doesn't exist here.


I used to buy this pasta sauce for $.99 in Kentucky. It does go on sale 3 for $10.


There is a sale on bacon too! It's $5.99 for a pound of bacon. It's not even thick sliced. I'll wait until the 2 pounds of think sliced goes on sale for 15.99.


Cake mix is $3.89. Back home it can be on sale for $.79. I miss Meijers. Erin misses HyVee.

That is the small baking soda that you see for $2.25.

This gets me so mad. It's 9.75 for cranberry juice and it's not even the diet or lite or even the 100% juice!

This is the best! That is 10.99 for a single 12 pack of coke.

Well, that's about it. There are some things that happen here in the bush that don't really happen in other places. For example: Beaver Round Up. Well, that is something for another blog.